Using NodeLocal DNSCache in Kubernetes clusters
Kubernetes v1.15
beta- The version names contain beta (e.g. v2beta3).
- Code is well tested. Enabling the feature is considered safe. Enabled by default.
- Support for the overall feature will not be dropped, though details may change.
- The schema and/or semantics of objects may change in incompatible ways in a subsequent beta or stable release. When this happens, we will provide instructions for migrating to the next version. This may require deleting, editing, and re-creating API objects. The editing process may require some thought. This may require downtime for applications that rely on the feature.
- Recommended for only non-business-critical uses because of potential for incompatible changes in subsequent releases. If you have multiple clusters that can be upgraded independently, you may be able to relax this restriction.
- Please do try our beta features and give feedback on them! After they exit beta, it may not be practical for us to make more changes.
This page provides an overview of NodeLocal DNSCache feature in Kubernetes.
Before you begin
You need to have a Kubernetes cluster, and the kubectl command-line tool must be configured to communicate with your cluster. If you do not already have a cluster, you can create one by using Minikube, or you can use one of these Kubernetes playgrounds:
To check the version, enter kubectl version.
Introduction
NodeLocal DNSCache improves Cluster DNS performance by running a dns caching agent on cluster nodes as a DaemonSet. In today’s architecture, Pods in ClusterFirst DNS mode reach out to a kube-dns serviceIP for DNS queries. This is translated to a kube-dns/CoreDNS endpoint via iptables rules added by kube-proxy. With this new architecture, Pods will reach out to the dns caching agent running on the same node, thereby avoiding iptables DNAT rules and connection tracking. The local caching agent will query kube-dns service for cache misses of cluster hostnames(cluster.local suffix by default).
Motivation
With the current DNS architecture, it is possible that Pods with the highest DNS QPS have to reach out to a different node, if there is no local kube-dns/CoreDNS instance.
Having a local cache will help improve the latency in such scenarios.Skipping iptables DNAT and connection tracking will help reduce conntrack races and avoid UDP DNS entries filling up conntrack table.
Connections from local caching agent to kube-dns servie can be upgraded to TCP. TCP conntrack entries will be removed on connection close in contrast with UDP entries that have to timeout (default
nf_conntrack_udp_timeoutis 30 seconds)Upgrading DNS queries from UDP to TCP would reduce tail latency attributed to dropped UDP packets and DNS timeouts usually up to 30s (3 retries + 10s timeout). Since the nodelocal cache listens for UDP DNS queries, applications don’t need to be changed.
Metrics & visibility into dns requests at a node level.
Negative caching can be re-enabled, thereby reducing number of queries to kube-dns service.
Architecture Diagram
This is the path followed by DNS Queries after NodeLocal DNSCache is enabled:
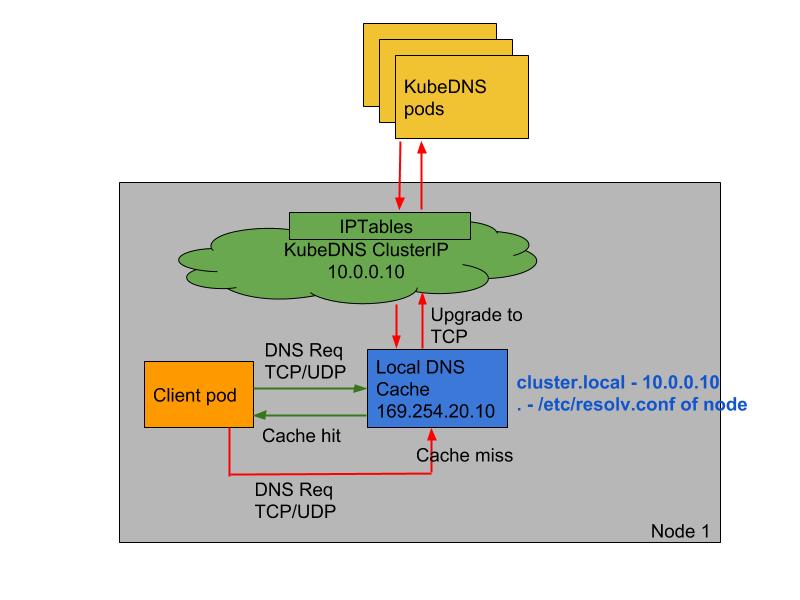
Nodelocal DNSCache flow
This image shows how NodeLocal DNSCache handles DNS queries.
Configuration
Note: The local listen IP address for NodeLocal DNSCache can be any IP in the 169.254.20.0/16 space or any other IP address that can be guaranteed to not collide with any existing IP. This document uses 169.254.20.10 as an example.
This feature can be enabled using the following steps:
- Prepare a manifest similar to the sample
nodelocaldns.yamland save it asnodelocaldns.yaml. Substitute the variables in the manifest with the right values:
kubedns=
kubectl get svc kube-dns -n kube-system -o jsonpath={.spec.clusterIP}domain=
<cluster-domain>localdns=
<node-local-address>
<cluster-domain>is “cluster.local” by default.<node-local-address>is the local listen IP address chosen for NodeLocal DNSCache.If kube-proxy is running in IPTABLES mode:
sed -i "s/__PILLAR__LOCAL__DNS__/$localdns/g; s/__PILLAR__DNS__DOMAIN__/$domain/g; s/__PILLAR__DNS__SERVER__/$kubedns/g" nodelocaldns.yaml
__PILLAR__CLUSTER__DNS__and__PILLAR__UPSTREAM__SERVERS__will be populated by the node-local-dns pods.
In this mode, node-local-dns pods listen on both the kube-dns service IP as well as<node-local-address>, so pods can lookup DNS records using either IP address.If kube-proxy is running in IPVS mode:
sed -i "s/__PILLAR__LOCAL__DNS__/$localdns/g; s/__PILLAR__DNS__DOMAIN__/$domain/g; s/__PILLAR__DNS__SERVER__//g; s/__PILLAR__CLUSTER__DNS__/$kubedns/g" nodelocaldns.yaml
In this mode, node-local-dns pods listen only on
<node-local-address>. The node-local-dns interface cannot bind the kube-dns cluster IP since the interface used for IPVS loadbalancing already uses this address.__PILLAR__UPSTREAM__SERVERS__will be populated by the node-local-dns pods.Run
kubectl create -f nodelocaldns.yamlIf using kube-proxy in IPVS mode,
--cluster-dnsflag to kubelet needs to be modified to use<node-local-address>that NodeLocal DNSCache is listening on. Otherwise, there is no need to modify the value of the--cluster-dnsflag, since NodeLocal DNSCache listens on both the kube-dns service IP as well as<node-local-address>.
Once enabled, node-local-dns Pods will run in the kube-system namespace on each of the cluster nodes. This Pod runs CoreDNS in cache mode, so all CoreDNS metrics exposed by the different plugins will be available on a per-node basis.
You can disable this feature by removing the DaemonSet, using kubectl delete -f <manifest> . You should also revert any changes you made to the kubelet configuration.
Feedback
Was this page helpful?
Thanks for the feedback. If you have a specific, answerable question about how to use Kubernetes, ask it on Stack Overflow. Open an issue in the GitHub repo if you want to report a problem or suggest an improvement.